Launch Your Token for Under $60
Token Creation Is Now a Design Problem — and the Tools Have Caught Up
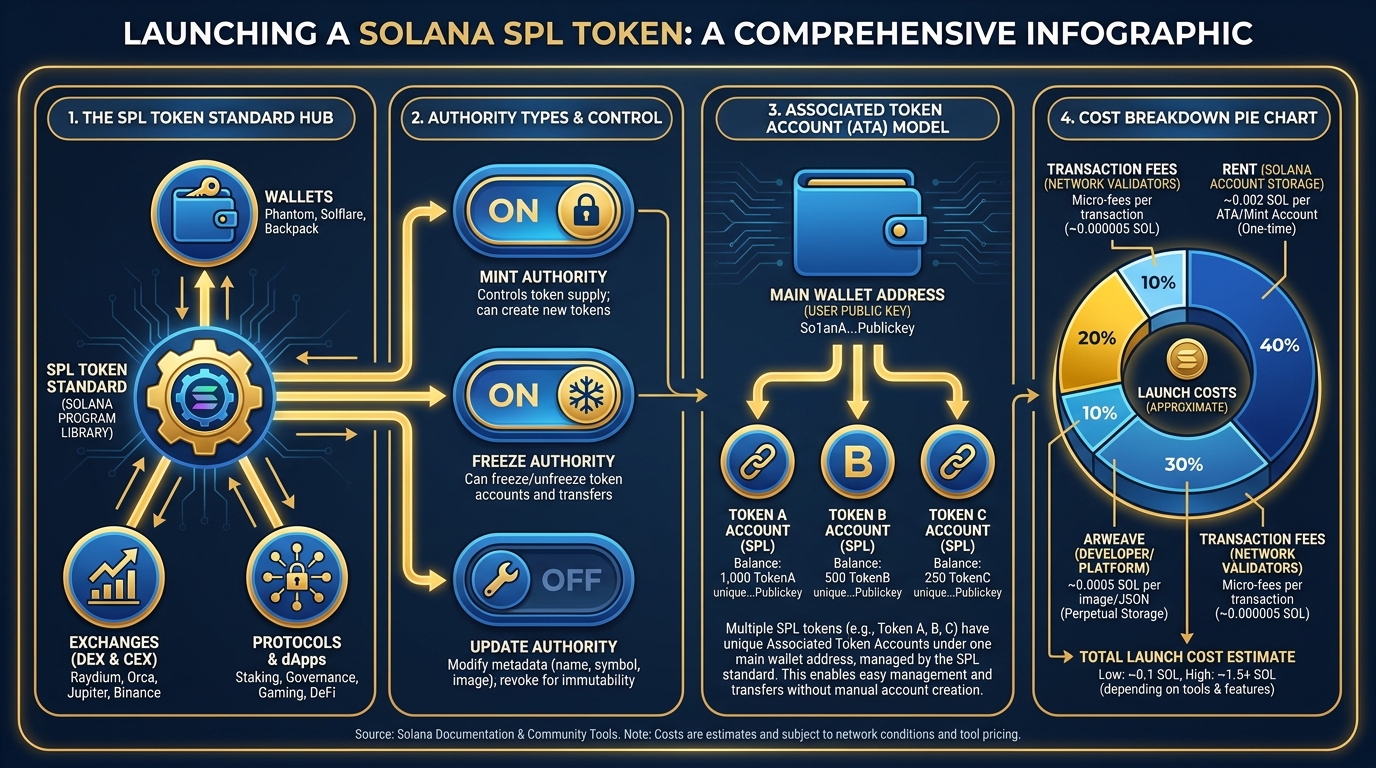
Figure 1:Chapter 3 Explainer Infographic: The complete map of Solana token creation — from the SPL standard that makes every wallet understand your token instantly, to the three powers you hold as creator, to the $60 that covers it all.
Ten years ago, creating a digital currency required a team of cryptographers, months of engineering work, and a whitepaper dense enough to cause genuine discomfort. Today it is a form. You fill it in, upload a logo, click a button, and your token exists on one of the fastest blockchains ever built, instantly recognized by every compatible wallet on the planet.
The interesting question is no longer how. The tools have made “how” trivial. The interesting question is what you do the moment after you click Deploy. What does your token mean? Who should hold it? What prevents you from minting a billion more at midnight? What would a regulator think of the fact that you can? These are not technical questions. They are design questions, governance questions, and in some jurisdictions, legal questions.
This chapter gives you the technical foundation — the real understanding of what happens when you launch a token, not just the steps — and then puts a live token in your hands. By the end, you will have a mint address you can share with anyone on earth, and a much clearer sense of the responsibility that comes with it.
1The SPL Token Standard: Why Every Wallet Already Knows Your Token
When developers talk about “standards” in software, they mean something precise and powerful: a shared agreement about how a thing should behave, so that every piece of software built to support the standard automatically supports every thing that follows it.
Think of the electrical outlet standard in the United States. Every manufacturer who builds a device with a standard two-prong or three-prong plug has access to every outlet in the country. They do not need to negotiate with each building owner. They do not need to write a driver for each wall socket. The standard is the agreement, and the agreement does the work.
The SPL Token standard is Solana’s equivalent for digital assets. SPL stands for Solana Program Library — a set of programs deployed on the Solana blockchain that define, in precise on-chain code, exactly how a token should work. Every token that follows this standard behaves identically at the protocol level: it can be created, transferred, burned, and frozen using the same instructions, the same account structures, and the same cryptographic signatures.
The consequence of this is enormous, and it is easy to underestimate. When you launch an SPL Token today, every wallet that supports Solana — Phantom, Backpack, Solflare, Coinbase Wallet, and dozens of others — can immediately receive, display, and transfer it. Every decentralized exchange built on Solana can list it. Every block explorer can track it. You did not call any of those applications. You did not integrate with any of them. They were already built to understand anything that speaks the SPL language, and your token speaks it fluently the moment it is deployed.
This is not how it works without standards. In the early days of the Ethereum ecosystem, before the ERC-20 standard became dominant, every token was its own snowflake. Wallets had to add custom code to support each one. Exchanges had to write individual integrations. The ecosystem was fragmented and slow. The adoption of ERC-20 — Ethereum’s equivalent of SPL — transformed the ecosystem overnight. Suddenly, every compatible wallet worked with every compliant token. The standard created interoperability as a free gift to every new token creator.
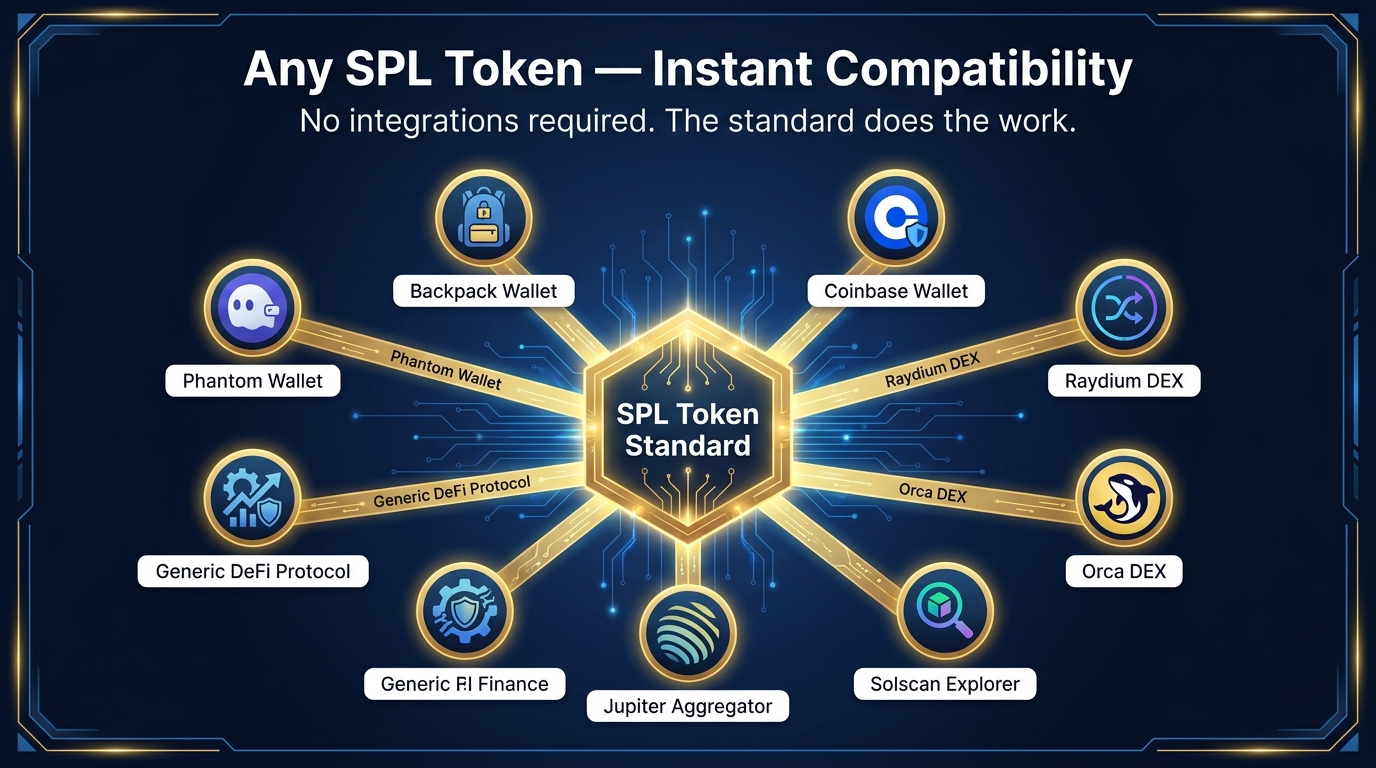
Figure 2:The SPL Standard as Interoperability Engine: Any token built to the SPL specification is automatically compatible with every wallet, exchange, and protocol that speaks the same language — no individual integrations required.
Why this matters for your token specifically: You are not building a custom financial instrument from scratch. You are building on top of infrastructure that the entire Solana ecosystem has already agreed to support. Your token inherits trust — not in you, but in the standard. That is a meaningful head start.
2Three Powers: Mint Authority, Freeze Authority, and When to Give Them Up
When you deploy an SPL Token, you become the initial holder of three distinct capabilities. Understanding what these powers do — and what it signals when you hold them — is one of the most important design decisions you will make.
2.1Mint Authority: The Power to Create More
The mint authority is the address that can create new tokens at any time. If you hold mint authority, you can, at this moment, generate an additional trillion tokens and send them into circulation. No one needs to approve this. No governance vote is required. The blockchain will execute the instruction without complaint.
Think of it like being the only person who knows the combination to the central bank’s printing press — and there is no board of governors, no congressional oversight, no Fed meeting required. You print. It happens.
For a startup with a vision, this flexibility sounds appealing. You might want to release tokens in phases — a founding team allocation now, an advisor allocation later, a community treasury distribution when certain milestones are hit. Holding mint authority lets you manage that schedule.
But here is what your token holders see when they look at your contract on Solscan: Mint authority: [your wallet address]. They see that you can dilute their holdings at will. Every token they hold might be worth less tomorrow morning if you decide to print more. This is not hypothetical — it has happened many times in the history of token projects. A founder holds mint authority “temporarily,” an emergency arises, tokens get minted, holders lose value they never agreed to lose.
The professional signal — the signal that serious projects send — is an irrevocable burn of mint authority. Once you execute the transaction that permanently assigns mint authority to a null address (the zero address, from which no private key exists), the token supply is fixed forever. No one, including you, can ever create another token. The maximum supply is locked at whatever was minted before the burn. Token holders can verify this on any block explorer in seconds.
This is not a loss of control. It is a gain of credibility. It is the difference between your token holders hoping you will not inflate the supply and being mathematically guaranteed that no one can.
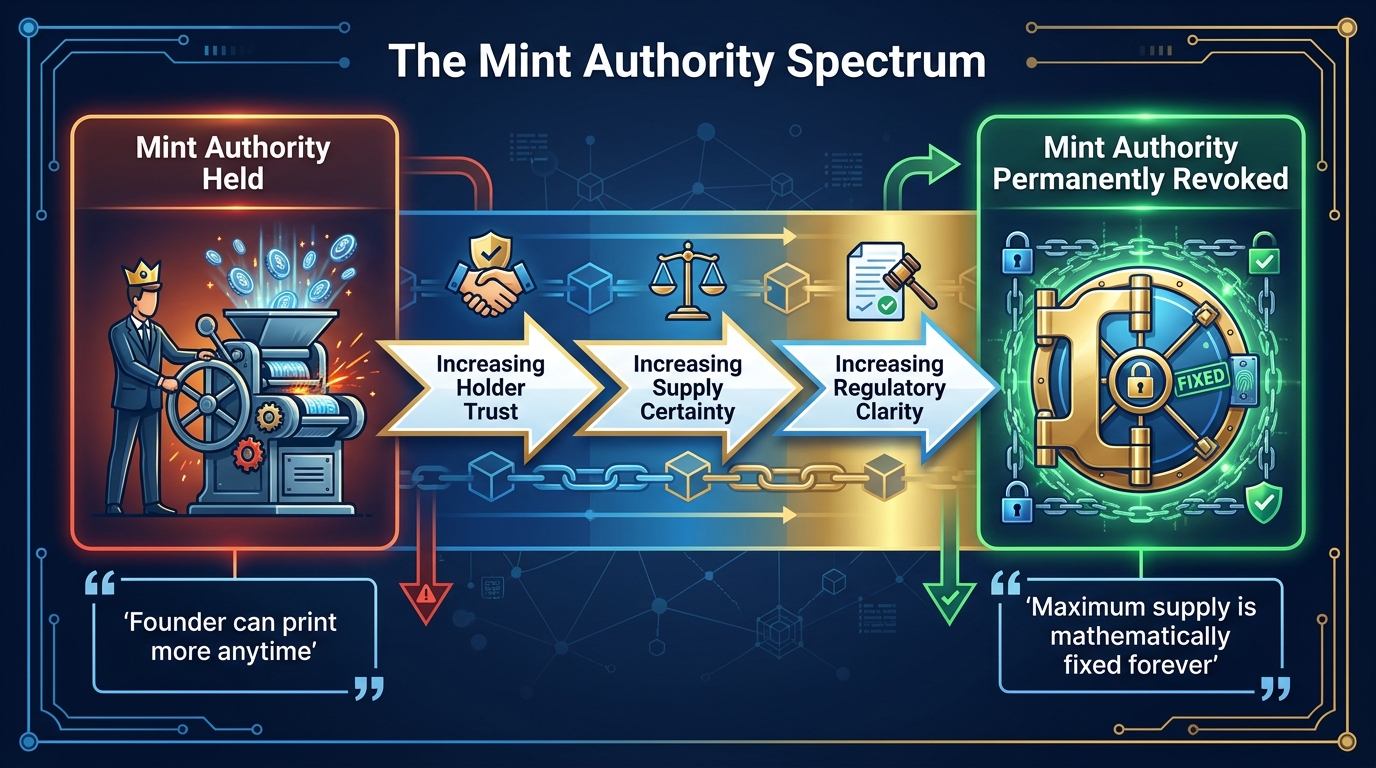
Figure 3:The Mint Authority Spectrum: Holding mint authority preserves flexibility but creates holder risk. Permanently revoking it eliminates inflation risk and communicates fixed supply — a design decision with lasting consequences for your token’s credibility.
2.2Freeze Authority: The Power to Halt Someone’s Tokens
The freeze authority is more dramatic and more legally fraught. If you hold freeze authority, you can freeze the tokens in any account that holds your token — not just the tokens you created, but any holder’s balance. Their tokens become non-transferable. They cannot send them, sell them, or use them in any protocol until you unfreeze them.
There are legitimate use cases: a regulated financial instrument might require the ability to comply with a court order, a sanctions list, or an AML action. A permission-based loyalty program might legitimately need to freeze points pending fraud investigation.
But for most token projects, holding freeze authority is a significant red flag. Imagine discovering that the token you bought on a decentralized exchange can have your balance frozen by a single wallet address — with no appeal mechanism, no legal process, no notice required. In many jurisdictions, a smart contract that gives one party the power to freeze another party’s assets starts to look a great deal like a security, complete with the regulatory obligations that come with that designation.
Most serious DeFi projects revoke freeze authority permanently at launch or shortly after. When you see “Freeze Authority: None” on a Solscan token page, you are seeing a deliberate signal: no one can freeze your balance.
2.3Update Authority: The Power to Change Metadata
A third, often overlooked authority sits in the metadata program: the update authority, which controls the ability to change a token’s name, symbol, description, and logo URI. Hold it and you can rename your token tomorrow. Revoke it and the metadata is permanent.
For a serious project, revoking update authority at the appropriate moment — after the metadata is finalized — is another mark of maturity. It prevents a scenario in which a bad actor (or even a well-intentioned but poorly-advised founder) changes the token’s identity after distribution.
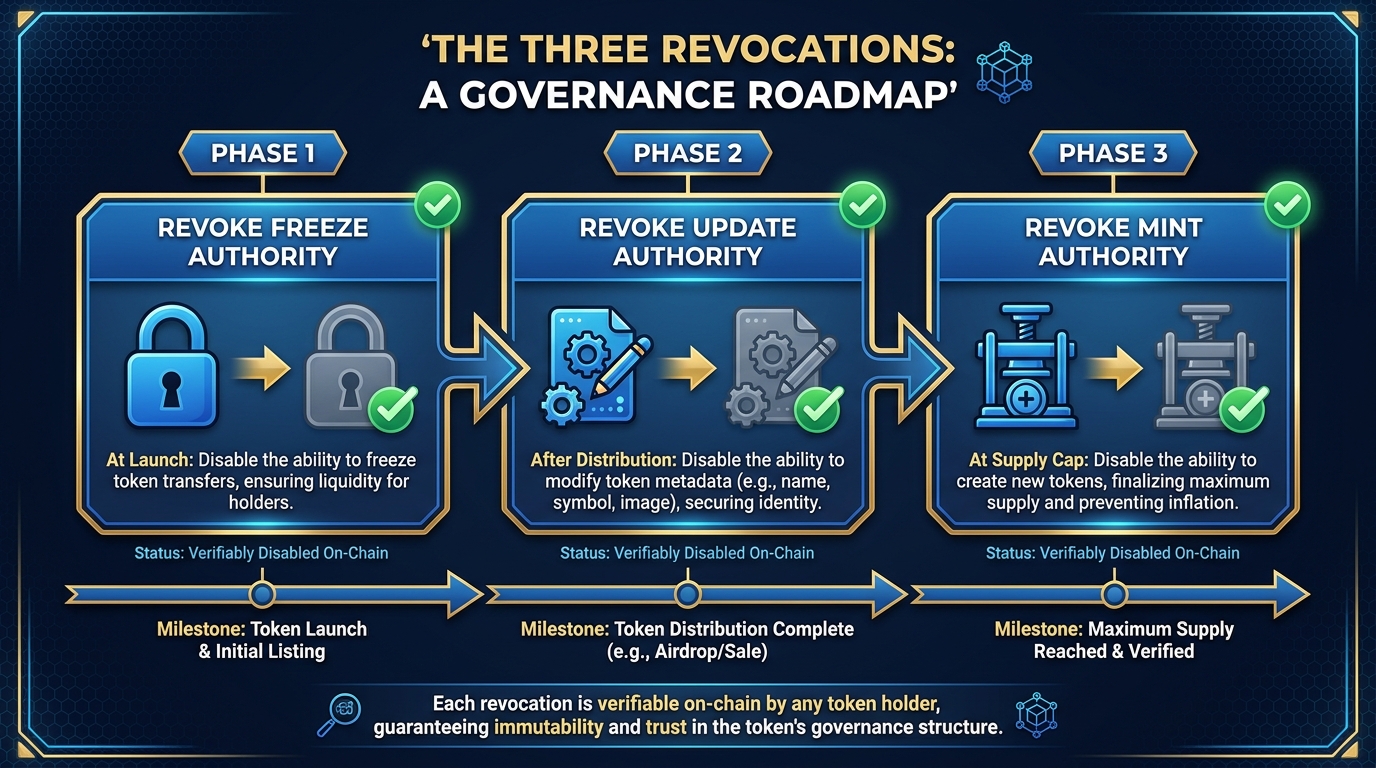
Figure 4:Authority Revocation Roadmap: A phased approach to revoking token authorities builds credibility systematically. Each revocation is an on-chain event any holder can verify — turning a governance commitment into a mathematical guarantee.
3Token-2022: Extensions for Business Tokens
There are two token programs on Solana. The original SPL Token program is what this chapter’s lab uses — it is the standard described above, and it is deliberately minimal: mint, transfer, burn, freeze, and nothing else. The second is Token-2022 (also called Token Extensions), a newer program from Solana Labs that adds optional, per-mint features on top of the same standard. A Token-2022 mint is still an SPL-standard token: Phantom, Solscan, Jupiter, and Raydium’s CPMM pools all support it. Older programs — Raydium’s AMM v4 pools and some legacy tools — do not, so check compatibility before pairing a Token-2022 mint with an older protocol.
Why should a business student care? Because several of the design problems this book raises in later chapters have protocol-level answers in Token-2022 — features enforced by the token program itself rather than by your application code or your promises. Here are the extensions that matter for a business token:
Transfer fee. A percentage of every transfer is withheld to a treasury or burned, automatically, on every transaction. This is Chapter 4’s consumption sink enforced by the protocol rather than by your app. No integration, no honor system — the token itself collects the fee.
Non-transferable. A token that cannot leave the wallet it was minted to. This is the real way to build Chapter 2’s reputation token and Chapter 9’s soulbound credential: a certification that cannot be sold is a certification that actually means something.
Permanent delegate. An authority that can transfer or burn tokens from any account holding the token. This is the compliance clawback for regulated assets (Chapter 12) — a court order can be executed on-chain. It is also a glaring red flag on a token that claims to be community-owned: whoever holds the permanent delegate can take anyone’s tokens at any time.
Default account state (frozen). New token accounts start frozen until the issuer thaws them. This is how you build a KYC-gated token: no one can receive or trade it until the issuer verifies them and unfreezes their account. This is the real-world-asset pattern from Chapter 2, implemented at the mint level.
Confidential transfers. Transfer amounts are encrypted on-chain while remaining auditable by the issuer. This is the privacy answer to Chapter 10’s “glass airplane” problem — a payroll paid in tokens does not have to broadcast every salary to the world.
Interest-bearing. A display-only interest rate that shows balances growing over time. No new tokens are actually minted — wallets simply display the accrued amount. Useful for representing interest-bearing instruments without continuous mint transactions.
Metadata pointer / on-chain metadata. The token’s name, symbol, and URI stored directly on the mint account, without a separate Metaplex metadata account. One account instead of two.
Transfer hook. A program of your choosing that runs on every transfer of the token. This is the mechanism behind enforceable NFT royalties in Chapter 9 — the hook can reject any transfer that does not pay the royalty.
3.1Which Extensions for Which Token?
| Token Type (Ch. 2) | Extensions to Consider | What a Buyer Should Think When They See It |
|---|---|---|
| Payment | Transfer fee (if fee-funded treasury) | A small fee is a disclosed business model; a large one is a tax |
| Access / Membership | Transfer fee; metadata pointer | Reasonable — fees fund the community treasury |
| Ownership / RWA | Default frozen; permanent delegate; transfer hook | Expected — this is how compliance works on-chain |
| Reputation / Credential | Non-transferable | Correct — a sellable credential is worthless |
| Regulated asset | Default frozen; permanent delegate; confidential transfers | Expected and disclosed in offering documents |
| Any “community” token | — | Permanent delegate or default frozen on a token marketed as community-owned = walk away |
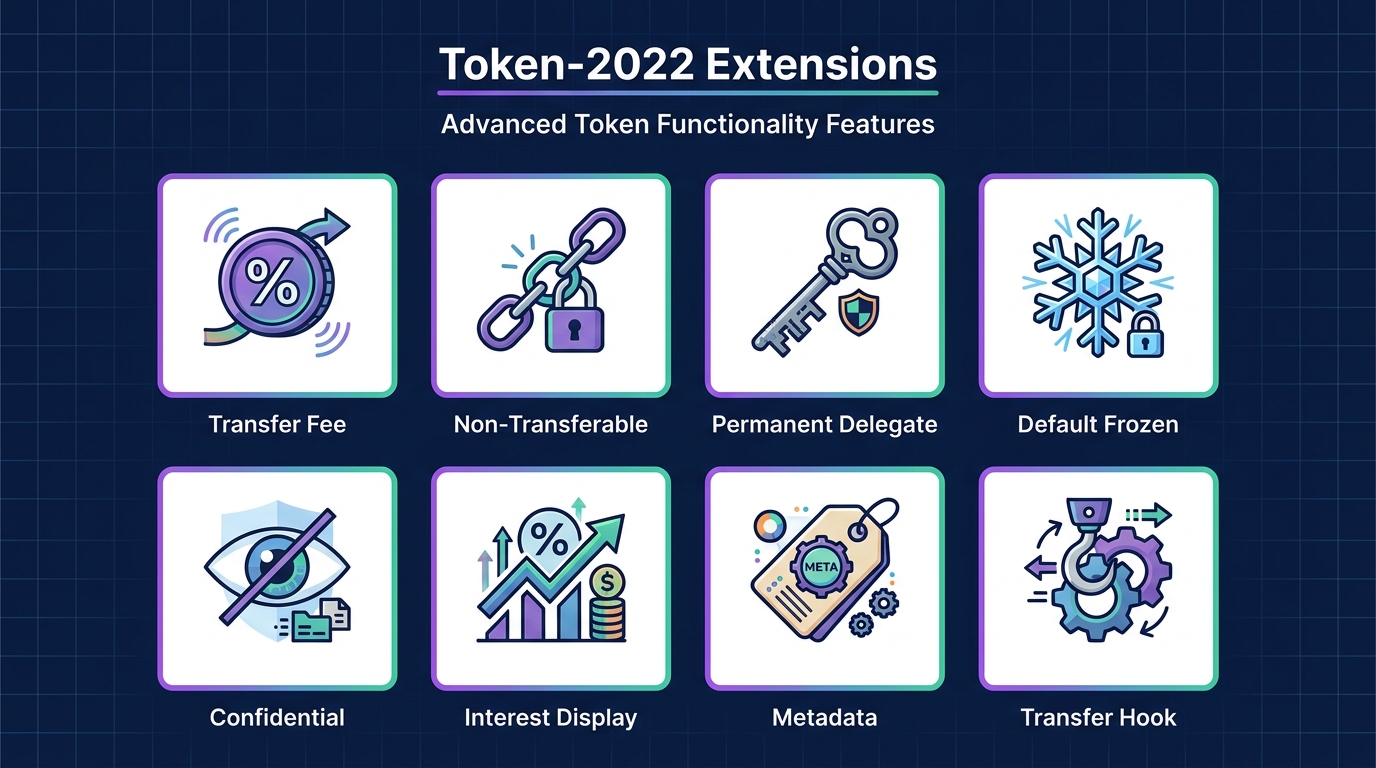
Figure 5:Token-2022 Extensions for Business Tokens: Eight optional, per-mint features that move common business requirements — fees, compliance, privacy, non-transferability — from application code into the token program itself. All are set at mint creation.
4Associated Token Accounts: Why Receiving a New Token Is Not Automatic
Here is something that surprises almost everyone encountering Solana for the first time: you cannot simply send someone a new token. If a person has never held your token before, their wallet does not yet have a place to receive it.
This is a consequence of Solana’s account model, and understanding it reveals something important about how Solana’s design priorities differ from Ethereum’s.
On Ethereum, the balance of every token for every address is tracked inside the token contract itself — a giant mapping of address to balance. You can “send” anyone an ERC-20 token even if they have never interacted with that token before; the contract just updates an entry for their address. The cost is borne by the sender.
Solana’s model is different. Every piece of state on Solana must live in an account, and accounts cost rent (a small SOL deposit that reserves space on the validator network). For tokens, this means that for each holder of each token, a separate Associated Token Account (ATA) must exist — a dedicated account that holds exactly one person’s balance of exactly one token.
The phrase “Associated Token Account” is derived from a deterministic algorithm: given a wallet address and a token’s mint address, you can always compute the expected ATA address without any lookup. It is associated because the relationship is derived from the two inputs, not stored anywhere.
What this means practically: when you send your token to someone for the first time, you — the sender — must pay the rent (approximately 0.002 SOL, about $0.20 at SOL ≈ $100) to create their ATA if it does not yet exist. No-code tools like Smithii handle this automatically; it is baked into the cost of sending. But it is important to understand why this happens, because it shapes how you design an airdrop, a distribution, or a reward program.
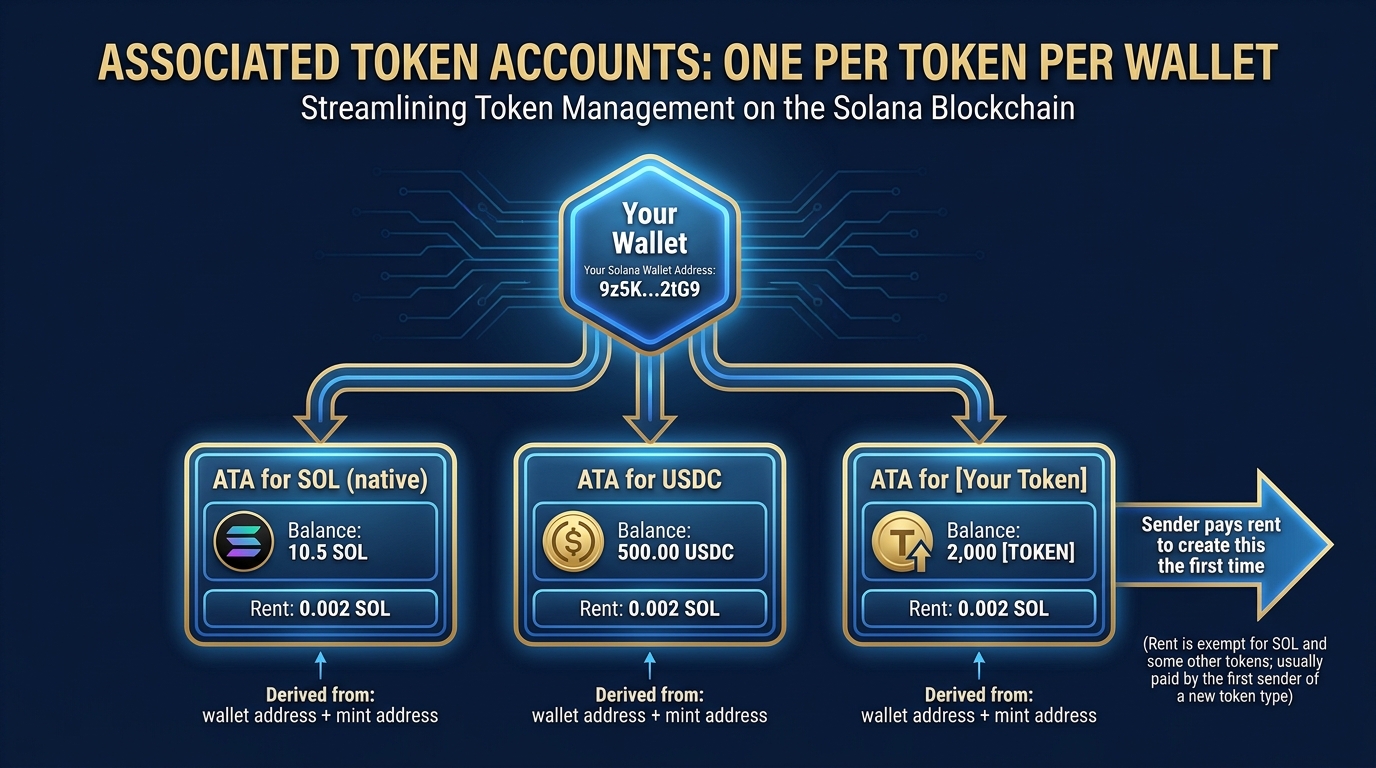
Figure 6:Associated Token Accounts: Each holder of each token needs a dedicated on-chain account. These are derived deterministically from the wallet address and mint address, and cost a small SOL rent deposit to create — typically paid by the sender on the first transfer.
The deeper lesson: Solana’s design makes all state explicit and costed. Nothing is free. Nothing is hidden inside a contract. This makes the system faster and cheaper for common operations, but it means that certain operations — like distributing tokens to thousands of new holders — carry costs that Ethereum developers might not expect. When you are planning an airdrop of your new token to five thousand wallets, you are also budgeting to create five thousand ATAs. At roughly 0.002 SOL per account, that is 10 SOL in rent alone, separate from transaction fees.
5Metadata: On-Chain vs. Off-Chain, and Why the Logo Lives Somewhere Else
When someone opens Phantom and sees your token — with its name, ticker symbol, and logo displayed cleanly — what they are seeing is the result of a metadata architecture that is less straightforward than it appears.
On-chain metadata is stored using the Metaplex Token Metadata standard, which is the dominant metadata layer for Solana tokens. When you use a no-code tool to create your token, it automatically calls the Metaplex metadata program and creates a metadata account associated with your token’s mint address. This account stores your token’s name, symbol, and — here is the key — a URI pointing to a JSON file hosted somewhere on the internet.
That JSON file, typically stored on Arweave (a permanent storage blockchain), IPFS, or a centralized server, contains the rest of the metadata: the full description, the logo image URL, and any additional attributes you want to include. The Metaplex standard specifies the exact JSON schema that wallets expect.
So when Phantom displays your logo, it is actually doing this, behind the scenes:
Find the metadata account for this token’s mint address on-chain
Read the URI from that account
Fetch the JSON file from that URI
Parse the image URL from the JSON
Download and display the image
This two-layer architecture — a small on-chain record pointing to richer off-chain content — is a pragmatic design choice. Storing images directly on Solana would be extraordinarily expensive (every byte of on-chain storage has a rent cost). Storing the image on Arweave or IPFS is cheap and, in Arweave’s case, designed to be permanent. The on-chain record provides the authoritative link; the off-chain storage provides the content.
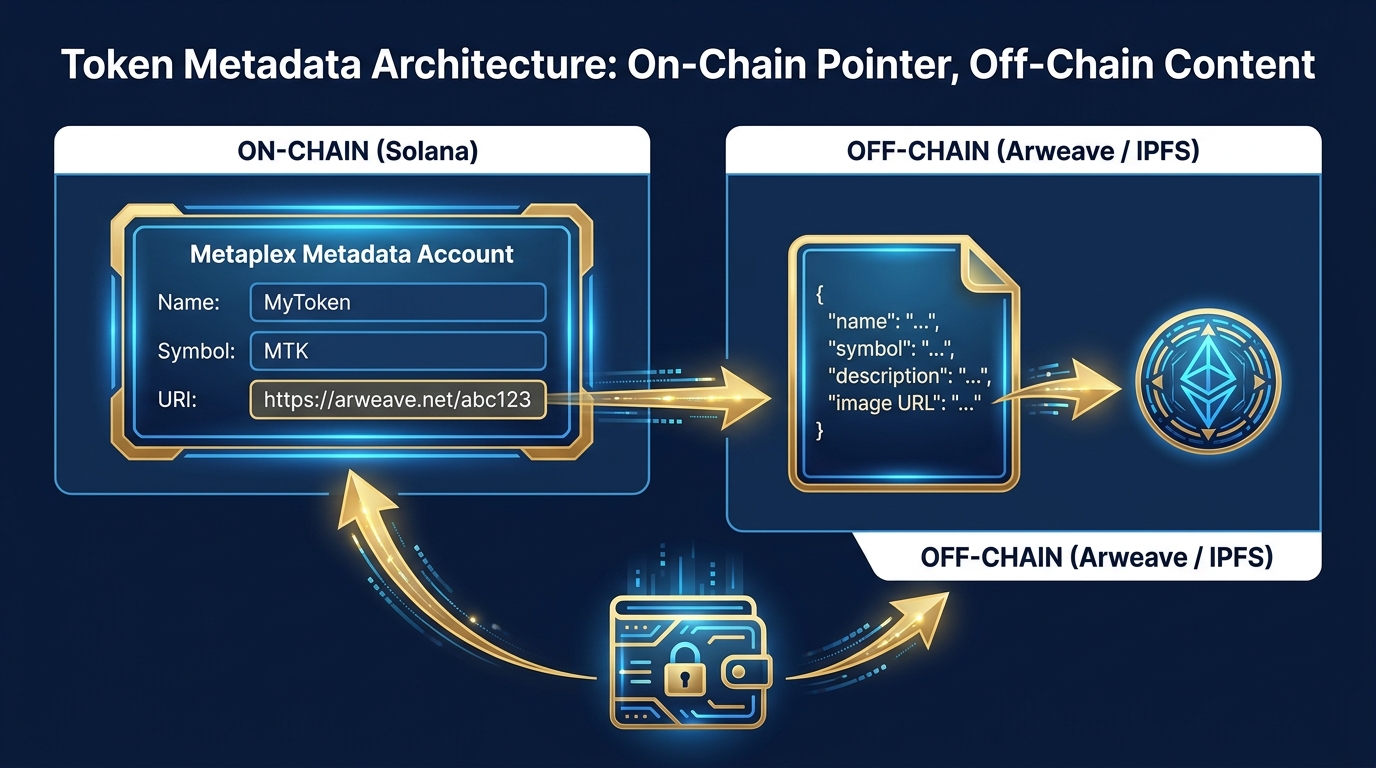
Figure 7:Token Metadata Architecture: On-chain metadata is a small record containing a URI. That URI points to a JSON file (typically on Arweave or IPFS) which contains the full name, symbol, description, and image URL. Wallets follow this chain automatically.
6The Squarespace Analogy: No-Code Tools as a Layer Over the Same Primitives
When Squarespace launched, web developers were skeptical. “Real” websites were built in HTML, CSS, and JavaScript. A visual drag-and-drop interface felt like a toy — something for people who did not know how to code.
What Squarespace actually was, was a layer of abstraction over exactly the same web primitives that developers use. Every Squarespace site generates HTML, CSS, and JavaScript. The DNS records are real DNS records. The hosting infrastructure is real hosting infrastructure. Squarespace did not create a different kind of website. It created a different interface for creating the same kind of website.
No-code token creators — tools like Smithii.io, SPL Token UI, Solana Compass’s Token Creator (solanacompass
Generate a new keypair (the mint address)
Call the SPL Token program to initialize the mint with your specified parameters
Call the Metaplex metadata program to create and populate the metadata account
Create an associated token account for your wallet
Mint your specified initial supply to that account
Optionally revoke mint and/or freeze authorities
You are not doing something fundamentally different from a developer. You are using a better interface for the same underlying operations. The transactions that result are identical to what a developer would produce. A block explorer cannot tell the difference between a token created with Smithii and one created with the Solana CLI.
This matters because it means your token is not a “weaker” token because you used a no-code tool. It is a real SPL token. It has a real mint address. It participates in the real Solana ecosystem. The abstraction is complete.
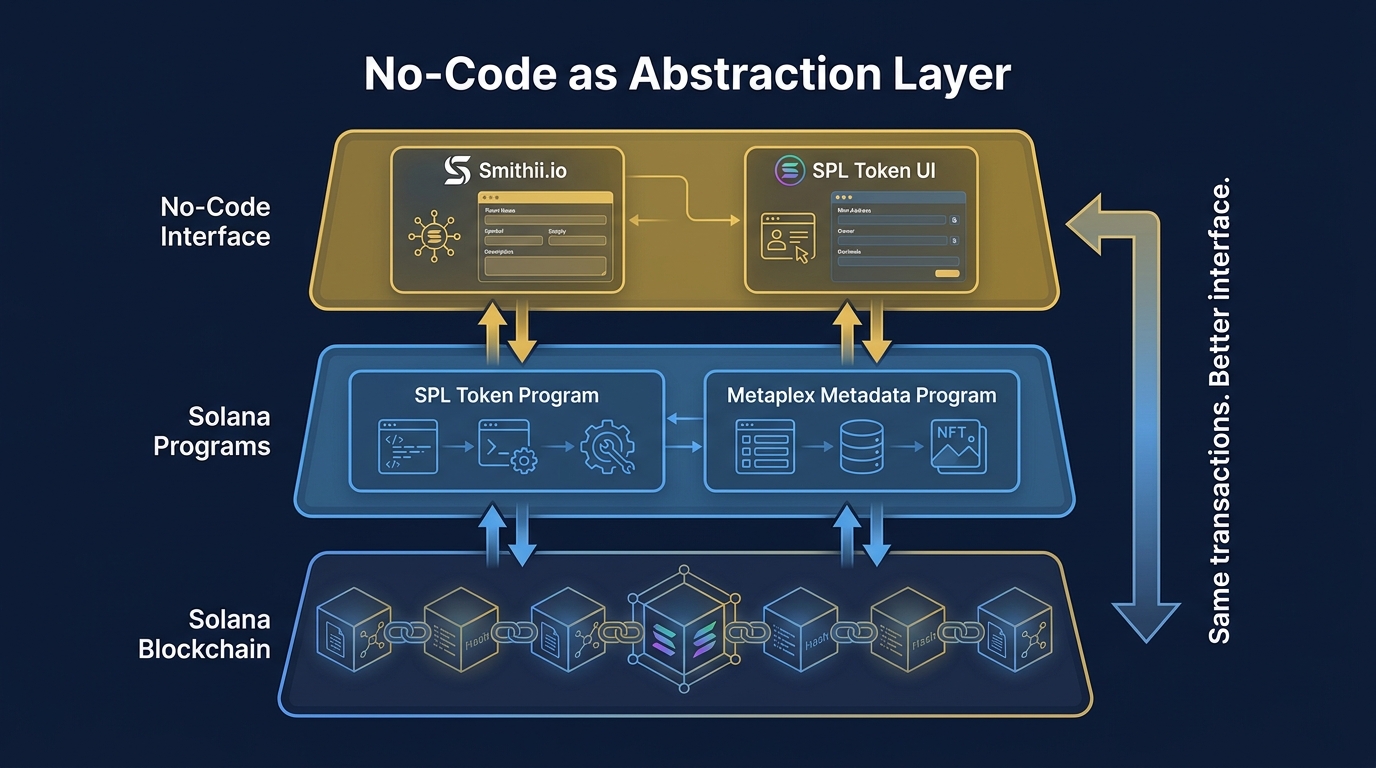
Figure 8:No-Code as Abstraction Layer: Smithii, SPL Token UI, and similar tools generate the same on-chain transactions a developer would write — they simply provide a better interface. The resulting token is indistinguishable at the protocol level.
7Cost Anatomy: What the $60 Actually Pays For
The phrase “launch your token for under $60” sounds like a marketing claim. Let us make it a financial statement by examining exactly what you are paying for.
The costs of launching a standard SPL token on Solana mainnet in 2026 break down as follows:
Mint Account Rent: ~0.0014 SOL (~$0.20) The mint account is the on-chain record that defines your token — its supply, decimals, and authorities. Like all Solana accounts, it requires a rent-exempt deposit of SOL to exist. This deposit is not a fee — it is a reservation of block space. Technically, you can reclaim it if you close the account, but you should not, because closing the mint account effectively destroys the token.
Metadata Account Rent: ~0.015 SOL (~$2.00) The Metaplex metadata account requires a larger rent deposit because it stores more data — the name, symbol, and URI. This is the amount that varies most by metadata complexity.
Arweave Upload (for logo and JSON): ~$1–3 USD equivalent in AR tokens Permanent storage on Arweave costs a one-time fee based on file size. A 100KB logo and a small JSON file together cost roughly $1–3, with Arweave’s storage endowment mechanism guaranteeing perpetual hosting. No-code tools handle this seamlessly — your upload cost is calculated and included.
Transaction Fees: ~0.000005 SOL per transaction ($0.0007 each) Solana’s transaction fees are genuinely negligible. The multi-step token creation process involves 4–6 transactions at a total cost of well under $0.01. This is one of Solana’s structural advantages.
No-Code Tool Fee: $10–50 USD This is where most of the “$60” comes from. Tools like Smithii charge a one-time service fee — typically $10–30 for basic token creation, up to $50 for packages that include metadata upload, authority revocations, and initial liquidity setup. This is a fair exchange: the tool saves you hours of CLI work, handles the Arweave upload, and provides a verification step that most developers skip.
Total Range: Approximately $15–60 USD for a fully deployed, metadata-complete SPL token on mainnet.
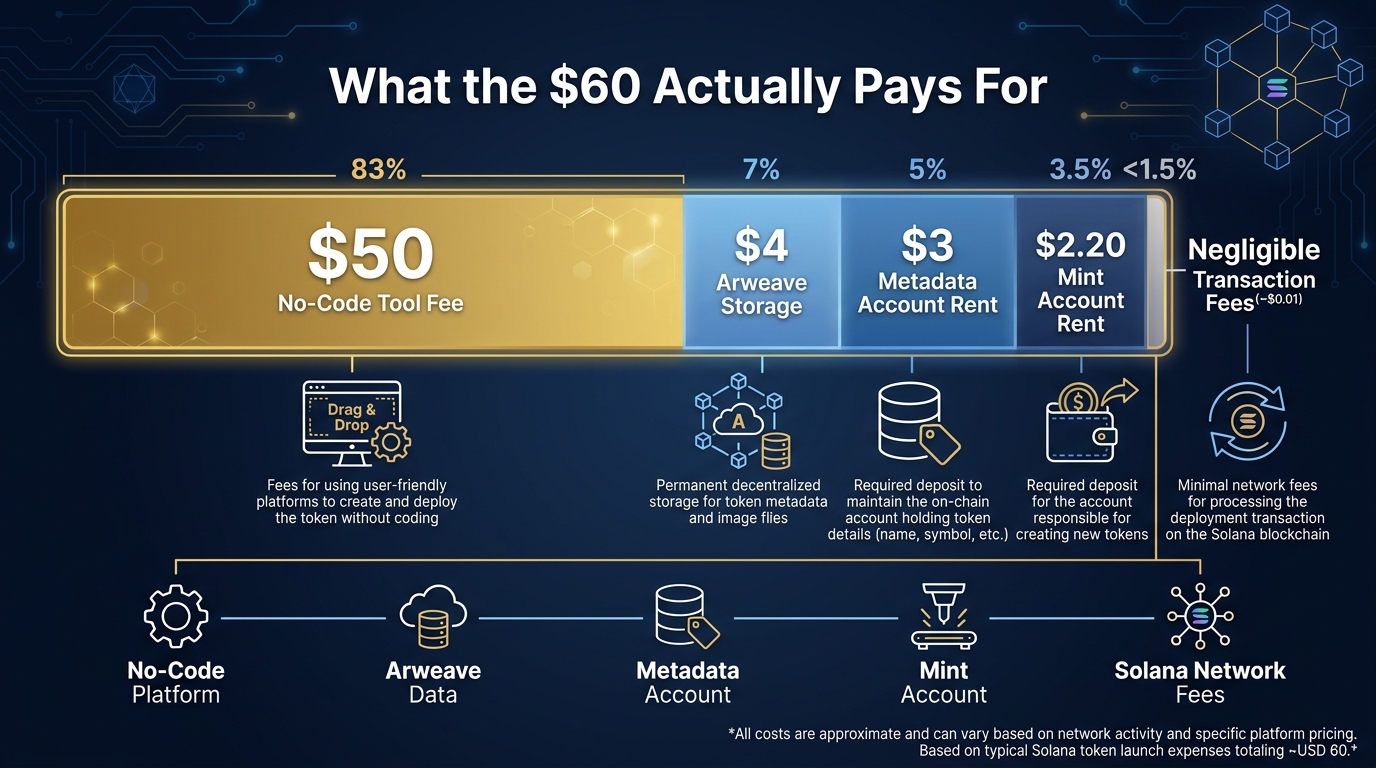
Figure 9:Token Launch Cost Anatomy: The majority of the launch cost is the no-code tool service fee. The actual on-chain costs — rent deposits and transaction fees — are a small fraction. Understanding what each dollar pays for helps you evaluate alternative tools.
8🛠️ Hands-On Lab: Deploy Your Token to Mainnet
This is the moment the chapter has been building toward. You are going to deploy your token to Solana mainnet. The token you designed in Chapter 2 — with its name, symbol, supply, decimals, description, and logo — goes live.
8.1Step 1: Connect Your Wallet
Navigate to Smithii.io (or SPL Token UI if you prefer — both are reputable tools used by the community). Click “Connect Wallet” and approve the connection request in Phantom. Confirm you are on mainnet-beta — both Smithii and Phantom display the active network in their interfaces. If either shows “devnet” or “testnet,” switch to mainnet before proceeding.
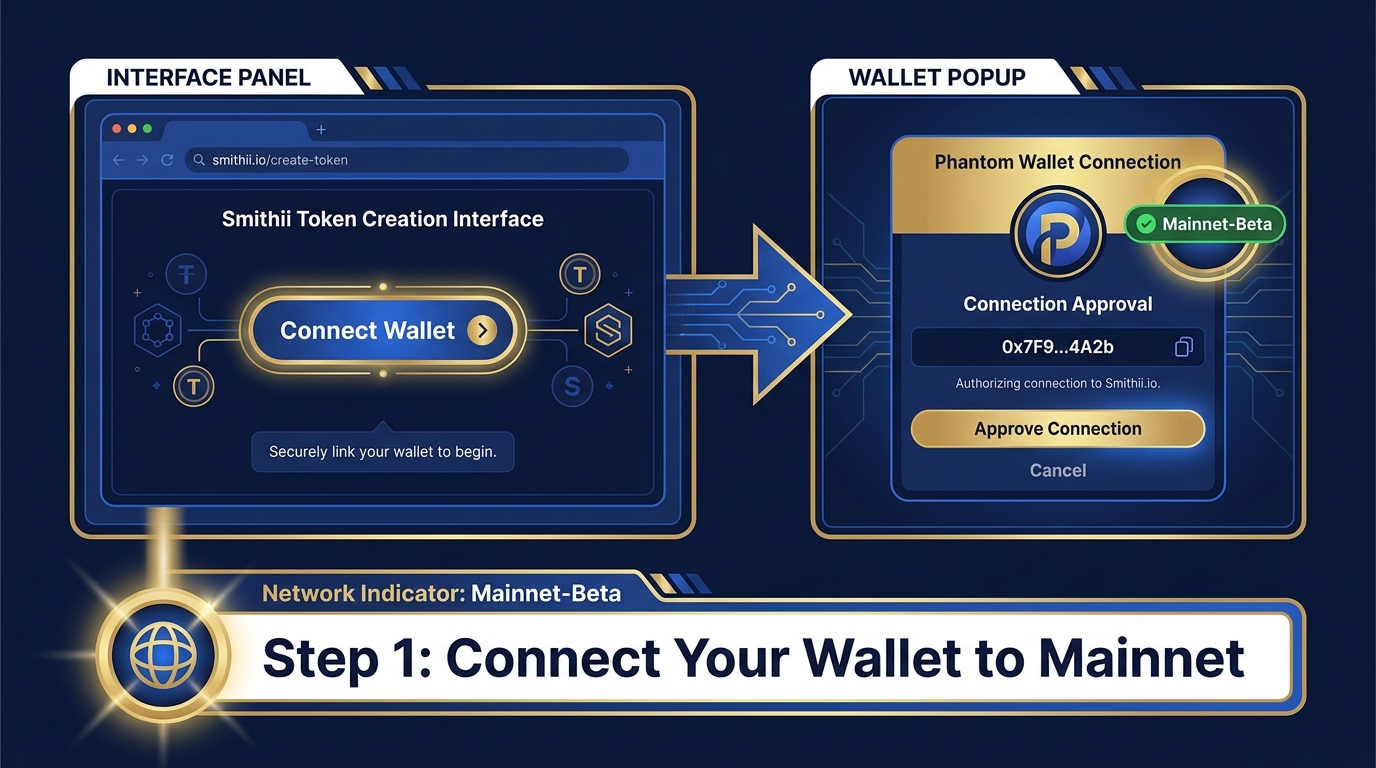
Figure 10:Connect Wallet: Both the no-code tool and Phantom must be on the same network. Verify mainnet-beta is selected in both interfaces before proceeding — a devnet deployment costs nothing but is also worth nothing.
8.2Step 2: Enter Your Token Brief
Fill in the creation form with your Chapter 2 brief:
Token Name: Your chosen name (e.g., “Campus Loyalty Token”)
Token Symbol: Your ticker (e.g., “CLT”) — 2–10 characters, no spaces
Decimals: Most community and loyalty tokens use 6. If you want whole-unit tokens only, use 0. Stablecoins typically use 6 or 9.
Total Supply: Your initial mint amount (e.g., 1,000,000). Remember: if you revoke mint authority after deployment, this is your maximum supply forever.
Description: 1–2 sentences from your token brief
Logo: Upload your PNG file
8.3Step 3: Configure Authorities
This is the decision point we discussed in the theory section. Smithii will typically offer checkboxes for:
Revoke Mint Authority — strongly recommended for tokens with a fixed supply
Revoke Freeze Authority — strongly recommended for all but regulated/compliance tokens
Revoke Update Authority — optional; consider leaving this enabled until your metadata is finalized, then revoking
Make your selections deliberately. You cannot undo an authority revocation.
8.4Step 4: Review and Deploy
Smithii will show you a summary of all parameters and the estimated SOL cost. Review carefully:
Is the token name spelled correctly?
Is the symbol what you intended?
Is the supply the right number?
Did you choose the right authority settings?
Click Create Token (or equivalent). Phantom will pop up with a transaction confirmation request. Review the fee displayed and approve. You may see multiple sequential transaction confirmations — approve each one. The tool is executing the sequence of on-chain calls described in the theory section.
After a few seconds, you will see a confirmation screen with your mint address — a base58-encoded string that looks something like 7xKXtg2CW87d97TXJSDpbD5jBkheTqA83TZRuJosgAsU. Copy this address and store it in multiple places. This is your token’s permanent identity on Solana.
8.5Step 5: Verify in Phantom
Open Phantom. Your newly created tokens should already appear in your wallet — the initial supply was minted directly to your connected wallet’s associated token account. If the token does not appear automatically, look for a “Manage Token List” option or use the search function.
Confirm:
The token name and symbol display correctly
The logo appears (may take 1–2 minutes for metadata to propagate)
The balance reflects your initial supply
8.6Step 6: Locate Your Token on Solscan
Navigate to Solscan.io and paste your mint address into the search bar. You will land on your token’s page on the most widely used Solana block explorer. Verify:
Token name and symbol match your intent
Metadata tab shows your description and logo
Supply matches what you deployed
Mint authority shows “Disabled” if you revoked it (or your wallet address if you did not)
Freeze authority shows “Disabled” if you revoked it
This Solscan page is your token’s public identity. Bookmark it. It is the URL you will share when someone asks for your token’s details.
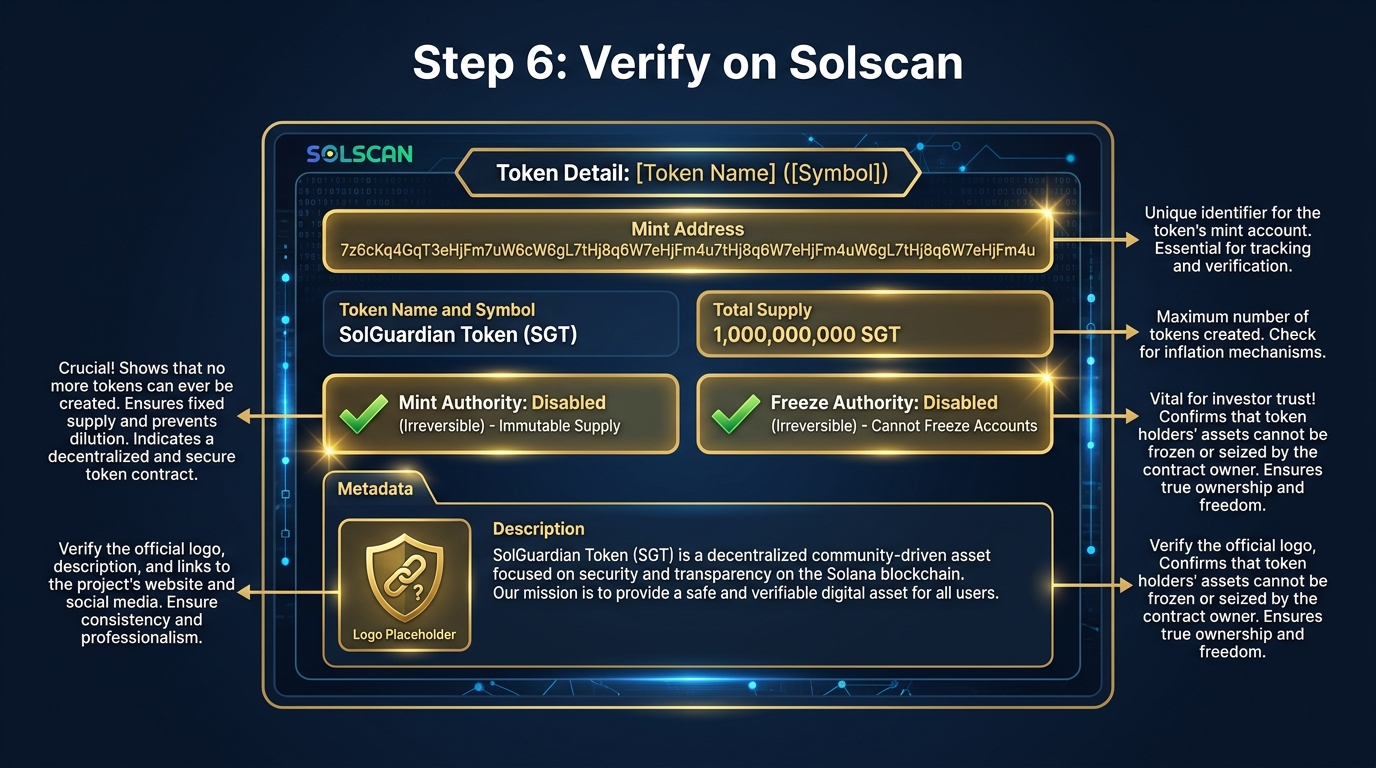
Figure 11:Solscan Token Verification: Your Solscan page is your token’s permanent public record. Confirm all metadata renders correctly, verify authority status matches your intentions, and bookmark this URL as your token’s canonical identifier.
8.7Step 7: Send 100 Tokens to Your Backup Wallet
Open Phantom and send exactly 100 of your tokens to your backup wallet address. This step accomplishes several things:
It proves your token can be transferred (a basic but important functionality check)
It creates the backup wallet’s associated token account (you pay the ATA creation fee)
It gives you experience with the transfer flow you will use when distributing tokens
Wait for the transaction to confirm (typically under 1 second on Solana mainnet). Open your backup wallet and confirm the 100 tokens are visible. Find the transfer transaction on Solscan — navigate to the transaction hash in Phantom’s activity log and verify all fields show correctly.
8.8Step 8: Read a Token-2022 Token in the Wild (10 min)
On Solscan, open the PYUSD (PayPal USD) mint:
2b1kV6DkPAnxd5ixfnxCpjxmKwqjjaYmCZfHsFu24GXo. On the token page, note the Owner Program field shows Token 2022 Program, not the original SPL Token program.Find the Extensions panel. PYUSD enables confidential transfers, transfer hook, permanent delegate, metadata + metadata pointer, mint close authority, and transfer fees. For each, write which business need from the table in the Token-2022 section above it serves (for example: permanent delegate = regulatory clawback; confidential transfers = payroll privacy).
Compare to your own token’s page: your token program, your extensions (none). Write two sentences on which single extension you would add to your token and why — or why none.
8.9Step 3b (Optional, Devnet): Mint a Token-2022 Test Token
Switch Phantom to devnet (Settings → Developer Settings → Testnet Mode). Get devnet SOL at
https://faucet.solana.com.Open Smithii’s Tax Token Creator (tools.smithii.io → Solana → Tax Token Creator), which mints a Token-2022 token with the transfer-fee extension. Switch it to devnet, and create a throwaway token with a 1% transfer fee.
Send 100 tokens to your backup wallet. On Solscan (devnet), open the transfer and find the withheld fee. Record it.
8.10Deliverable
Submit to your instructor:
Screenshots: The Smithii confirmation screen (or equivalent) and your Solscan token page showing the mint address, token name, and authority status
Your mint address — the base58 string you can share with anyone in the world to let them look up your token
A brief statement (3–5 sentences) describing one authority decision you made and why
9The Moment After You Click Deploy
You now have a mint address. Let us be precise about what that means.
You have created an entry in a distributed ledger maintained by thousands of independent validators around the world. That entry defines a new category of asset — your token — with the rules you specified. Anyone with the mint address can look it up on any Solana block explorer and see its supply, its authorities, and every transaction ever conducted with it.
You have not created value. Not yet. What you have created is infrastructure — a vessel for value that someone might want to fill. The token has supply, but it does not have demand. It has a name, but it does not have utility. It has a mint authority (or it does not, if you revoked it), but it does not have governance. All of the interesting work begins now.
This is precisely the point the chapter opened with. Token creation is no longer the hard part. The tools have solved the hard part. What remains — designing the economic incentives, distributing fairly, creating real utility, building the community that gives a token meaning — is harder than any CLI command. It requires understanding human motivation, economic design, and the trust-building process that turns a mint address into something people actually want to hold.
The chapters ahead address each of those problems directly. But you needed to hold a live token first. Now you do.
10💬 Discussion: The Mint Authority Question
Discussion Guidelines:
Write a substantive main response (200+ words) that takes a genuine position rather than hedging between both sides. Include at least one scholarly or credible source — an academic paper, a credible news article, or an on-chain data reference — that supports your argument.
Respond to at least two peers with substantial engagement. “I agree” is not substantial. Engage with their specific argument: what is its strongest point, what is its weakness, and does it change your position at all?
11🏗️ Group Build: Design Your Token’s Authority Strategy
In your group, use an AI tool (Gemini, Claude, or ChatGPT) as a thinking partner to identify a real token project — one you could realistically build for your organization, community, or course context — and develop a specific authority revocation schedule.
Your strategy should include:
A clear statement of what the token is for and who will hold it
A specific decision for each of the three authorities (mint, freeze, update) — keep, revoke at launch, or revoke on a schedule
A rationale for each decision that accounts for both token holder interests and regulatory risk
A response to the hardest objection a skeptic would raise
Use AI to stress-test your reasoning. Ask it: “What is the strongest argument against this revocation schedule?” Let it push back, and let that push back sharpen your strategy.
Groups should be prepared to present their strategy and explain what the AI got right and what it missed.
12🎯 In-Class Assignment: Token Authority Decision Memo (10 pts)
Details and instructions will be provided in class.
Points: 10
13Glossary
SPL Token Solana Program Library Token — the on-chain standard for fungible digital assets on Solana. Any wallet or protocol supporting the SPL standard automatically supports every SPL token.
Mint Address The public key of the on-chain account that defines a specific token — its supply, decimals, and authorities. Every SPL token has a unique mint address that serves as its permanent identifier on the Solana blockchain.
Mint Authority The address that holds the power to create (mint) new tokens. If held, the authority can increase the total supply at any time. Can be permanently revoked by assigning it to the zero address.
Freeze Authority The address that holds the power to freeze any token holder’s balance, preventing them from transferring or using their tokens. Most non-regulated token projects revoke this at launch.
Update Authority The address in the Metaplex metadata program that can modify a token’s name, symbol, description, or logo URI. Should be revoked once metadata is finalized to prevent future changes.
Associated Token Account (ATA) A dedicated on-chain account that holds one address’s balance of one specific token. Derived deterministically from the wallet address and token mint address. Must be created (and costs a rent deposit) before a wallet can receive a new token for the first time.
Metaplex The dominant metadata standard for Solana tokens and NFTs. Provides the on-chain account structure that stores a token’s name, symbol, and URI pointing to off-chain JSON metadata.
Arweave A permanent, decentralized storage network commonly used to host token metadata JSON files and logo images. Charges a one-time fee in exchange for guaranteed perpetual storage.
Rent A SOL deposit required to keep an on-chain account active on Solana. The deposit is proportional to the account’s storage size and is returned if the account is closed (though token mint accounts should not be closed).
Devnet Solana’s development network — identical in behavior to mainnet but using free SOL with no real-world value. Used for testing deployments before committing real money on mainnet.
Smithii A no-code token creation tool for Solana that provides a web interface for deploying SPL tokens, uploading metadata to Arweave, and managing token authorities without requiring command-line access.
Solscan The most widely used block explorer for Solana. Provides a public, readable page for every token, wallet, and transaction on the network. A token’s Solscan page is its primary public identity.
Fixed Supply A token configuration in which mint authority has been permanently revoked, ensuring the total supply can never increase beyond what was initially minted.
Rent-Exempt Deposit The minimum SOL balance required in an account to keep it alive on the Solana network indefinitely. For mint and metadata accounts, this deposit persists for the life of the token.
Mainnet-Beta Solana’s live production network, where tokens have real economic value and all transactions are final. Distinct from devnet (free testing) and testnet (validators test new features).
Token-2022 Solana’s second token program (also called Token Extensions), which adds optional per-mint features — fees, transfer restrictions, privacy, hooks — on top of the SPL standard. Supported by Phantom, Solscan, Jupiter, and Raydium’s CPMM pools; not by some older programs. Extensions are set at mint creation and most cannot be added later.
Transfer Fee (Extension) A Token-2022 extension that withholds a configured percentage of every transfer to a treasury or for burning, enforced by the token program on every transaction.
Non-Transferable (Extension) A Token-2022 extension that prevents a token from ever leaving the wallet it was minted to. The protocol-level mechanism for soulbound credentials and reputation tokens.
Permanent Delegate (Extension) A Token-2022 extension granting one authority the power to transfer or burn tokens from any holder’s account. Used for regulatory clawback on compliant assets; a serious red flag on a token marketed as community-owned.
Default Account State (Extension) A Token-2022 extension under which new token accounts start frozen until the issuer thaws them. The mechanism for KYC-gated and accredited-only tokens.
Confidential Transfers (Extension) A Token-2022 extension that encrypts transfer amounts on-chain while keeping them auditable by the issuer. Provides transaction privacy without leaving the public ledger.
Interest-Bearing (Extension) A Token-2022 extension that displays balances growing at a configured rate. No new tokens are minted; wallets compute and display the accrued amount.
Metadata Pointer (Extension) A Token-2022 extension that stores a token’s name, symbol, and URI directly on the mint account, without a separate Metaplex metadata account.
Transfer Hook (Extension) A Token-2022 extension that invokes a designated program on every transfer of the token, allowing custom rules — such as enforceable royalties — to run at the protocol level.
14Leader’s Takeaway
Token creation is now a solved problem. What remains unsolved — and far more interesting — is everything that follows. The design decisions you make in the first hours after deployment (Which authorities do you revoke? In what order? On what schedule? How do you communicate these decisions to holders?) are the decisions that determine whether your token becomes a trusted instrument or a cautionary tale.
The $60 buys you infrastructure. What you do with it is the real work — and it begins the moment the confirmation screen appears.
Next: Chapter 4 — Tokenomics on a Napkin: designing the supply schedule, vesting curves, and incentive structures that make a token economy self-sustaining.